In this blog we will show you how to install Oxwall in Ubuntu Server in your local PC for evaluation purposes. In our case we will use it for our Plugin Development.
Ubuntu Server is our choice since we are a vivid fan of Ubuntu, specially me.
1. Download a copy of Ubuntu Server here choose the latest version.
2. Install Ubuntu in your PC. How to install Ubuntu Server? Click here.
3. We are assuming in this stage that you have installed Ubuntu properly following the instructions given in the above link.
4. Set up FTP server in your Ubuntu. Detailed guide here.
5. Assign static IP to your Ubuntu Server. Click here. for instructions.
6. Download a copy of the latest Oxwall version available here.
7. Unzip and upload Oxwall in your Ubuntu Server using FTP client such as FileZilla. Get FileZilla here.
8. Enable mod_rewrite in your apache by running the following command in your terminal without the quote. "sudo a2enmod rewrite".
9. Restart your apache server by running the following command in your terminal without the quote. "sudo service apache2 restart".
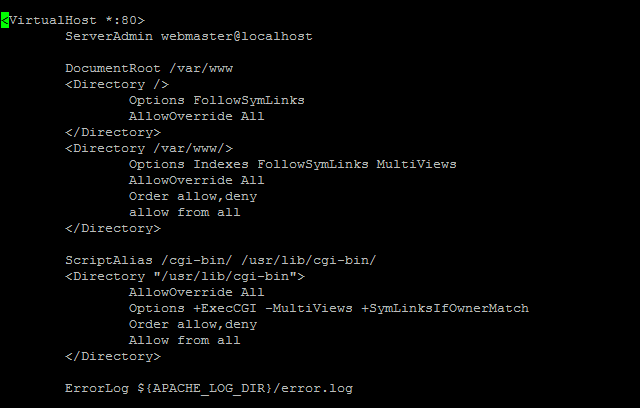
10. Edit sites-available/default to enable "Allow All". Run the following command in your terminal without the quote "sudo nano /etc/apache2/sites-available/default".
It should now look like this
11. Fire up Oxwall installation by typing in your browser ip_to_your_ubuntu_server/oxwall/install
12. Follow the Oxwall easy installation and you are done.
13. Login to your Oxwall.
That's it, you now have Oxwall installed for your testing or to create plugins.
It is really a plus if you know how to install Oxwall manually.
This tutorial is also available here http://app-arsenal.com/blog-post/4

