Challenge: Provide convenient option for avatars during the registration process as well as members access while on a budget and without having to purchase a plugin.
So lets get started....
1.CREATE AVATARS: Make a bunch of jpg avatars - this is the hardest and most painstaking part... Use photoshop, paint or other photo editor and create you a bunch of avatars that are 190x190, and a duplicate set that are 100x100, no larger no smaller.
Save them as jpg (lowercase) i prefer jpg for several reasons which i wont get into here. If your original image is NOT jpg and you have to use paint (and not a professional image editor) then save is as same meaning png as png and so forth. If you dont you will lose image quality.
If you have an image you want to use that is less than 190x190 either height or width, then:
a. cut the image
b. make a box 190x190
c. fill in with black (or the color you want)
d. and then paste the image and center it inside the box.
e. dont forget to also make your 100x100 version as well.
Example:
Original jpg image New jpg Avatar 190x190 100x100 version


File naming:
a. I would suggest you name them avatar_1.jpg 2 3 4 5 and so on...
b. Name your 100x100 versions something like smallavatar_1.jpg 2 3 4 5 6 ..... and so on
Once you get 10 or 15 made (which can be fun) then your ready to start building the user interface.
2. Create A Folder: First create folder to store the avatar images in. Just create it in your site root and i called mine myavatars. The folder can be 755 permission that is just fine.
a. Right now before you forget add that folder to your htaccess list so that oxwall will not give you a 500 server error for a folder it does not recognize.
b. Now upload all of your 190x190 and 100x100 images to this folder.
c. Check to be sure you can access the images from inside the site, if you get a 500 then you did not add the folder correctly to htaccess.
3. Build Avatar Page: Now we need to build a page for the user to visit when they want to see all your wonderful avatars on display.
a. Go to admin pages and create new page, make sure you drag it to the hidden page section. This will help assure that only access through the link you provide is done. Its not fullproof but its helpful.
b. Be sure you check both guest and members for visibility and also DO NOT use an external page when you set it up.
c. When it comes to the page content if you are familiar with html and a little javascript then it should be easy for you.
c1. The premise here is that you display the smaller 100x100 images to the user, this is done in a new tab (window) because you do not want to interfere with their registration or their profile edit process.
c2. When they click on the image then you open a small window with the downloadable image inside it at the proper size 190x190
c3. Then they (right-click/save as) that image and it downloads to their computer.
c4. Then they simply close your avatar tab (window) and they are right back on their registration or edit profile page and they can just select and upload the image as their avatar.
c5. So with that said the first thing you have to do in the page content is put some text on the top explaining the page but that is up to you. What we really need to do is to build a little table to display the images.
Here is the very basic layout of the table (my page is alittle fancier but this will give the idea of the layout) again this part can be tedious and take a while when listing the images but its worth it..
code follows: The table will hve 4 cells per row, so 4 images per row.
<blockquote>
<h3 style="color:#c3b00d;">Directions:</h3>
1. Click on the small image on this page to open a larger version of that image.<br />
2. Right click on the larger image and select "Save Picture as" to save the image to your computer. <br /><br />
3. <span style="color:#c6ae3d;">If you are just registering for the site</span> then when you are done downloading an avatar just close this page(tab). You will be able to complete your registration on the original window by uploading the avatar you just saved. <br /><br />
3a. <span style="color:#c6ae3d;">Otherwise if you are a member</span> and logged in, you can also just close the avatar display page and upload the image you just saved as your profile avatar.
</blockquote>
<br /><br />
<table width="90%" border="0" cellspacing="0" cellpadding="10">
<tr align="center">
<td align="center"><a href="javascript:void(0):" onclick="popitpic('/myavatars/avatar_1.jpg'); return false;"><img src="/myavatars/smallavatar_1.jpg" border="0" alt="" /></a></td>
<td align="center"><a href="javascript:void(0):" onclick="popitpic('/myavatars/avatar_2.jpg'); return false;"><img src="/myavatars/smallavatar_2.jpg" border="0" alt="" /></a></td>
<td align="center"><a href="javascript:void(0):" onclick="popitpic('/myavatars/avatar_3.jpg'); return false;"><img src="/myavatars/smallavatar_3.jpg" border="0" alt="" /></a></td>
<td align="center"><a href="javascript:void(0):" onclick="popitpic('/myavatars/avatar_4.jpg'); return false;"><img src="/myavatars/smallavatar_4.jpg" border="0" alt="" /></a></td>
</tr>
to explain the above code for those that dont know, what your doing is displaying the small image and then when they click it opens the larger one via a js window open routine when i will share that with you also.
The above was one row, you need to repeat that
<tr> row
<td>cell</td>
<td>cell</td>
<td>cell</td>
<td>cell</td>
</tr>
over and over for ever row of images that you have....
when you are done then just close the table like so:
</table>
Now save your page...
4. Now for the javascript: I created a file in my root and you may call it whatever you like just as long as it has the .js extention on it. So for this example we will call it avatarpop.js
Be sure you also add this file name to your htaccess to prevent a 500 server error
The purpose of this file is to display the larger images in a popup box so it looks more professional and clean. (if people block the popup thats not my problem sorry, just tell them not do)
inside this file i have this js code:
/* this is the function that is used for the avatar larger images to be shown in a popup window. */
function popitpic(url)
{
picwin=window.open( url, 'popwin','location=0,status=0,scrollbars=1,directories=0,resizable=0,height=250,width=250');
if ( window.addEventListner )
{
picwin.addEventListener( "load", picwinload, false );
}else{
picwin.attachEvent( "onload", picwinload );
}
function picwinload( )
{
picwin.moveTo(0,0);
picwin.document.body.bgColor="#100206";
}
}//close function
The way that is set up is that it will listen for the popup window, if the popup window is open it wont open it again. Also the popup window will open in the left corner of the page. Also the background will be set for the popup window.
5. Assigning the new JS file to oxwall header: Now that you have your js file, now you need to tell oxwall where it is so when someone clicks the image it knows where to find the function.
5a. open up admin settings, main settings, page settings.
Now inside of custom head code put this code..
<script type="text/javascript" src="http://www.yoursite.com/avatarpop.js"></script>
replace yoursite.com with your domain info..
save the changes.
Now you should be able to open up your new page (just type in the direct url in your browser) and then click the image and you should be able to see the larger avatar and then right click save as and save the image to your computer.
6. Now to include this in the registration process: Since an image is required to register then all we need to do is add a link option to that part of the registration to show them the avatar page.
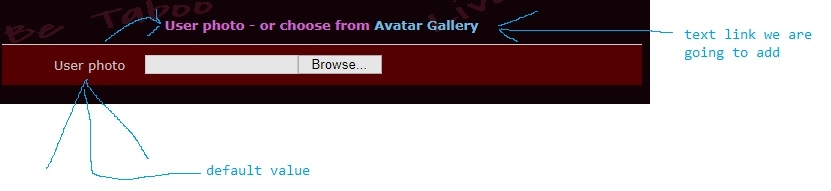
open up admin languages and search for User Photo (i believe is the default) or whatever you have as your default next to the checkbox on the registration form right here...
should be this lang key text key='base+questions_section_user_photo_label'}
and then just change the key language to read as follows.
Remember to change avatargallery to whatever you named your page to.
User photo - or choose from <a href="{$site_url}avatargallery" target="_blank">Avatar Gallery</a>
so now it should look like this in registration..
7. Now to include this in the edit avatar process: When they click on the change avatar link in the top right corner of their current avatar (profile page) then it will take you to a upload avatar page. This is what we need to add some text to. So again we just have to tweak some language text and we are good to go.
7a. Open up your admin language section and i believe the default is something like this "Avatar is a graphic" should be key {text key='base+avatar_avatar_is'}
7b. Just change the text to this:
Avatar is a graphic picture/photo of a reduced size displayed for your profile. You can save one from our <a href="{$site_url}avatargallery" target="_blank">Avatar Gallery</a> to your computer and upload it or you can upload one you already have that you like.
And thats it folks, now both the registration and avatar edit process your avatar will open in a new page and will not interfere with there process, they just simply click on the avatar they want, then right click save as (in the popup), then close the avatar page, and upload their new image..
Presto bango.... :)
Enjoy..
