We build. You grow.

Get best community software here

Start a social network, a fan-site, an education project with oxwall - free opensource community software

Tuto : Create a theme | Forum

Topic location: Forum home » Development » Themes
Max
Max Oct 22 '11
Hi !
Today, I decided to do a little tutorial for you :

How to create a new theme for Oxwall
.

Note : You can read this if you need to modify a theme


1/ Requirements
2/ Files  preparation
3/ Edit files
4/ CSS Edit
5/ Items
     a/ Texts and links
     b/ Background
     c/ Borders
     d/ Round corners
6/ Master_pages
7/ Export theme
 
 ---------------------------------------------------------------------------

1/ Requirements  
To create a new theme, you need:
-         
A base theme
-          A text editor (personally, I am using Notepad ++  but you can edit files with notepad on Windows)
-          A FTP client (like Filezilla) if you want work online
-         
A plug-in who help you to know which line to edit (like Web developer for Firefox , I.E., Chrome)

I recommend to works on a local installation. It’s easier, faster and more safely. 

-------------------------------------------------------------------------

2/ Files preparation 

First, download the base theme you want and upload it in ‘ow_themes’ 

Next, you have to enable Dev Mode to see your changes. To do it, open 'ow_includes/config.php' :
At line 45, replace :
define('OW_DEV_MODE', false);
by
define('OW_DEV_MODE', true);

And save. If dev mode is false, modify images and CSS in ow_themes will don't change anything

 -------------------------------------------------------------------------

3/ Edit files
 

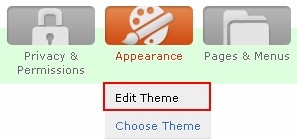
First, go to Admin panel, ‘Appearance’, ‘Choose Theme’, and choose your theme.
Click on ‘Activate  and back on your dashboard.


Now, you have the theme which will be edit.
I hope you installed the plug-in to edit CSS ;)

If Yes, right click on your site, choose ‘Web developer’, ‘CSS’, and  See the styles of a particular element’.

You must have now red border on each element you are hover like this :


  If you click on an element, a window is opening at the bottom of browser like this :


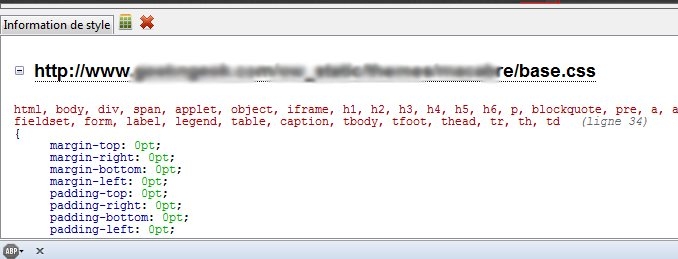
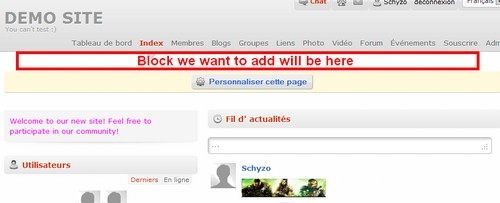
This window contains the choose style element. For example, click on the title’s website

 The begin isn’t interesting for us. DON’T TOUCH ANYTHING ON THIS PART. 
 The important is :

a (line 107)   a means hypertext links
{
     color: #3366cc;   Color of selected element
}  

a:hover (line 112)   a:hover means you are hover hypertext links

{

}

   .ow_header .ow_logo a (line 232)
{
 color: #999999;   Color of header
}  

There are some parts of the file ‘base.css  

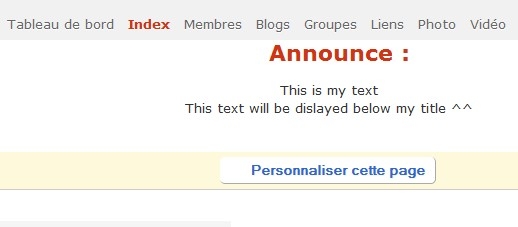
For example, we will change the color of hypertext links :  
Open the theme you downloaded earlier, and edit ‘base.css

Go to line 122. You must have this :
 

a:hover
{ }  

You have nothing between embraces. We will apply a color to hypertext links when you are hover them.
Insert this between embraces :

color: #000000;


To have this :

a:hover
{
 color: #000000;
}


Each command of a CSS file finish by a “;”  

Save your file and upload it into : 'ow_themes/yourtheme'

Why don't we put in ow_static folder ? Because it’s the ‘cache’ of your theme.
If you upload image or modify CSS in it, it will be displayed immediatly but if dev mode is true, cache is disable and ow_static will be overwrite.


Back to your website and refresh the page.

Tadaaaa! If you’re hover a link, its color change to black :)  

Now you have to edit your CSS like you want.


 -------------------------------------------------------------------------
4/ CSS Edit


In this section, we will learn to edit CSS.

There are two methods to edit the CSS, each with advantages and disadvantages. We will see in detail these methods :

a/ By Admin Panel

b/ By edit base.css

--------------------


a/ By Admin Panel

Oxwall gives to you the possibility to edit the layout content without modify anything.
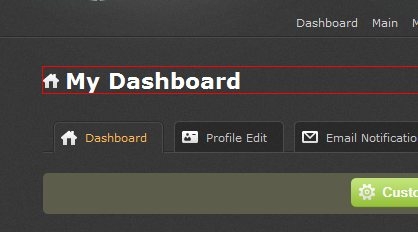
To edit CSS with Admin Panel, go to the Admin Area, menu 'Appearance', 'Edit Theme' :


Click on 'CSS' tab :


The page 'Edit CSS' is like this :


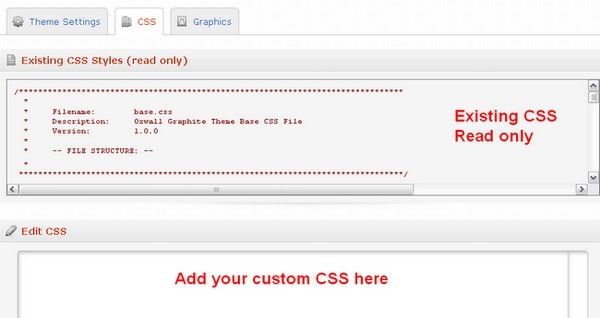
In top of page : Full content of base.css theme. You can't edit it in this text area (Read only).

Bottom : The text area where you can add your own CSS code.

Please Note :
- Custom CSS wrote in this page is generated by server, not present in files
- Custom CSS is read AFTER base.css, then each command wrote in custom CSS have priority. For example, if base.css defined size text 11 pixels and you set size text 13 pixels in custom CSS, text will be write in 13 pixels size.

Advantages : Quick Edit - No changed file
D
isadvantages : No file output - Code often repeated

I recommand this method if you want only modify an existing theme and you begin with CSS, but if you want create a theme,
this solution is not appropriate.


--------------------


b/ By edit base.css

The second method to edit CSS is to modify the base.css as I described above.
To do it, open 'ow_themes/mytheme/base.css' with your text editor.
Modify what you want, and upload it in 'ow_themes/mytheme/'

Remember : You have to enable DEV_MODE in config.php to see changes.

With this solution, you have to find which line to edit and replace it.

Advantages : Clean code - Can export theme
D
isadvantages : Longer and harder than admin panel

I recommand this method if you want to create your own theme
and for advanced users.


 -------------------------------------------------------------------------
5/ Items


In this part, we will learn base of CSS items :
 

a/ Texts and Links

Modify texts and links properties is very easy. Links have same properties than Texts, but they are often underline and color different.
Text Properties :

color : Color of text and links
Example : color: #FFFFFF ; will display selected text or links white

You can find html colors on many software like Photoshop or website like W3Schools


font-size: Size of text
Example : font-size: 11px ; Text will have 11 pixels size


font-family: Policy family
Example : font-family: "Trebuchet MS", Verdana, Geneva, Arial;
We are using many fonts to display text cause users haven't all font installed. If an user haven't the first font, he will see text in 'Verdana'
More, Trebuchet MS is in quotation marks cause it's using space (between Trebuchet and MS)


font-style: Text style
Example : font-style: bold;
Possible values : normal,bold,italic


text-align: Align text as you want
Example : text-align: center ; Text will be center in page
Possible values : left, center, right, justify


text-transform: To transform to capital, lowercase,...
Example : text-transform: capitalize; Will Display Text Like This
Possible values : none, capitalize, lowercase, uppercase


text-decoration: dress a text
example : text-decoration: underline; Text underline
Possible values : none, underline,overline, line through, blink (blink don't work with IE)


Please note : In CSS, links are in beacons 'a' like this :

ow_page a {
color: #ffffff;
}


b/ Background

In CSS, you can define an image and a color for background.

Example with Oxwall :

.ow_page_container .ow_page
{
    padding: 35px 18px 18px;
    min-height: 400px;
    color: #FF00FF;/** OW_Control key:textColor **/
    background: transparent url('images/semi-transparent.png') ;
}

The last line set the background of the ow_page_container and ow_page :
Color of background will be transparent but the picture 'images/semi-transparent.png' will be display behind.


background-color: Display the color set behind content
Example :background-color: #000000; show a black background
Possible values : #htmlcolor, transparent


background-image: display a picture behind content
Example : background-image: url(images/background.jpg);
Possible values : url(), none


background-attachment: set how background-image is display
Example : background-attachment: fixed; background image don't move with the page
Possible values : fixed, scroll (move with page)


background-repeat: choose if background-image will be repeat
Example :background-repeat: repeat-x; Background image will be repeat horizontally
Possible values : no-repeat, repeat-x, repeat-y, repeat (repeat horizontally and vertically)


background-position: choose position of background-image
Example : background-position:top center; Image will be placed in top of page, center horizontally
Possible values : top, center, bottom, left, center, right


c/ Borders

You can define color and width for border table and each item, for example a text or a picture.

Example :
.header {
background-color: #FF00FF;
border-width: 2px;
border-style: solid;
border-color: #333333;
}

In this example, each text in header will have a grey border with 2px size.


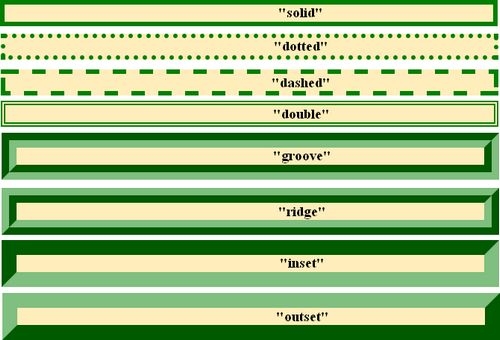
border-style: Effect of border
Example : border-style: dotted; The bordel will be draw with dot
Possible values : dashed, dotted, double, groove, hidden, inset, none, outset, ridge, solid

Border styles :


border-color: Set the color border
Example : border-color: #669900; Show a green border
Possible values : #htmlcolor, transparent

Be careful ! border-style must be set before border-color as the first example.


border-width: Size of border
Example : border-width: 3px ;


Position : You can select style and color for each border of an item like this :

border-bottom-style: solid;
border-bottom-color: #333333;
border-left-style: dotted;
border-left-color: #666666;
...


d/ Round Corners

With CSS, we can utilise rounder corner in design elements.
Here is an example :


The code for this example is quite simple :

.page {
border-radius: 5px;
}

But it doesn't works on every browser. We will see later..

How it works :

Rounder corners can be created independently using the four individual border radius properties.
The border radius properties can each accept either one or two values, expressed as a length or a percentage.

Examples :

                      
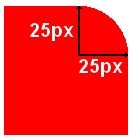
border-radius: 5px;                                   border-top-right-radius: 25px;      


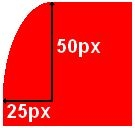
border-bottom-right-radius: 50px 25px;            border-top-left-radius: 25px 50px;


Browser Problems :

The following code doesn't work on every browser :

border-bottom-right-radius: 10px;

Why ?
At the moment, only a few browsers support the border-radius shorthand property :
Mozilla (v1 onward) supports border-radius with the -moz- prefix
Safari and Chrome (and other webkit based browsers) supports border-radius with the -webkit- prefix

Then if you want everybody see the rounded corners, you have to add prefix for each line like this :

border-top-left-radius: 25px 50px;
-moz-border-top-left-radius: 25px 50px;
-webkit-border-top-left-radius: 25px 50px;
border-bottom-right-radius: 15%;
-moz-border-bottom-right-radius: 15%;
-webkit-border-bottom-right-radius: 15%;


The Forum post is edited by Max Nov 9 '11
savvas
savvas Oct 22 '11
why when i upload a theme or a template i cant view it nowere in my admin ???????????????????????????????????????????????????? can some one bekind enough to give me a spot on solution.x Sav
Max
Max Oct 22 '11
do you upload it in ow_themes ?
Brad Mueller
Brad Mueller Oct 23 '11
hey max love thetutorial but i get los when your talking about the red border part i have the web developer plugin for fire fox but i get lost when u talk about you having to have the red border enabled. Is there any way we can talk out of the forum like in an email or anything like an instant messenger. But thank you for a tutorial. Its the first on for oxwall.
Brad
Max
Max Oct 24 '11
Hi Brad
The red border is activated when you click right on a page, choose 'Web developer', 'CSS', 'See the styles of a particular element' or press Crtl + Shift + Y
The Forum post is edited by Max Oct 24 '11
Den Team
Den Nov 1 '11
Nice tutorial for beginners Max, thank you for that! Only one mistake I found:
You have make all changes in ow_themes/your_theme/base.css file (not in ow_static/themes/your_themes/), because all changes will be lost when you enable DEV_MODE and all theme's cache files will be overwritten. Here is an the right way to make any changes in theme's files:
- enable DEV_MODE in ow_includes/config.php file;
- make all theme's changes in ow_theme/your_theme folder;
- after all changes done, disable DEV_MODE;

What about to add your tutorial to our official docs page here ? But it would be better if you add some more example of theme changes (not just a:hover)? So that beginners can learn how to change master_pages, add/replace images? I am sure, it this manual will be very helpful for others.Our team will prepare a blog post about first manual from one of our leader, also we will publish a link to you as a author of this tutorial. What do you think about this? 
The Forum post is edited by Den Nov 1 '11
Max
Max Nov 1 '11
Thanks Addenster.
Excuse me for the mistake.
Yes I would like to create good tutorials with more example but it was only a base for beginners cause I don't have enough times for the moment (my french community :) ) but I will make a better tutorial for themes.
Mutahir Mirza
Mutahir Mirza Nov 2 '11
I hate you for posting it now :/... :P... lol..
It took me about 2 weeks to make a theme for my website..
I changed things in the base.css in dreamweaver..
When I had to change a particular color for example.. I used to replace all of them in DW.. then in DW console find all of the changed codes, and change each line one by one.. ^_^.. took me ages! :D

This tutorial you made is amazing.. and simple! :D..
It would save alot of time for those who know nothing about editing/making a theme!

*likes*
Max
Max Nov 2 '11
Oh !
You re crazy to edit each line one by one !
Thanks
Dave
Dave Nov 3 '11
Well done max i can actually understand what your saying very nice tut
Mutahir Mirza
Mutahir Mirza Nov 3 '11
:D.. I'm changing now stuff this way.. works pretty well! :D

Thanks Max!
Den Team
Den Nov 6 '11
I understood you Max. No problems :) PM me when you will some free days and we will discuss this!
Max
Max Nov 7 '11
Update !
Next update : master_pages :)

Enjoy !
Max
Max Nov 7 '11
Next of tutorial.
I am forced to cut in 2 parts cause it's so long ^^
Don't forget read my first post, otherwise you will not understand :)


 -------------------------------------------------------------------------
6/ Master_pages

 
Now, we have to understand the functioning of pages. Pages of your website are generated by php and layout by CSS. But the skeleton of pages based on HTML documents.

 These HTML documents are in 'yourtheme/master_pages'. You're not forced to modify or create them. If master_pages isn't present in your theme, Oxwall will take master_pages of basic theme : Graphite.
That's why you have to keep folder 'graphite' in 'ow_themes' even if you don't use it.

Example : You delete graphite theme cause you are using 'club'. When you activate Dev_mode, cache is remove. So Oxwall will search html documents in 'club' theme to generate page. But club haven't all master_pages, only 'dndindex' and 'general' so it will search in 'graphite', but the folder doesn't exist.
=> He can't generate other pages like admin.
=> Try to go in admin panel, you have a 'OW_DEBUG EXCEPTION', and your site doesn't work :/

Remember you have to keep graphite theme even if you don't use it.
Understand ? Ok, we continue :)

In 'graphite' theme, you have 5 html documents. You can copy,modify but don't remove them.

I advise you not to change the pages of the 'graphite'theme . If you want to change this theme, it is better to work locally cause an error on your part and the site may no longer be displayed.

That's what these files :

admin.html : skeleton of admin panel
blank.html
: don't touch it ;)
dndindex.html : skeleton of the 'Main' page
general.html : is using for body of every pages
html_document.html : is base of master_pages. I think no change is needed in it.


We will learn how to modify a master page.
For example, we will take dndindex.html, the 'Main' page and add a block for what you want (Announce, advertisement, ...)
It will be displayed below the menu, at top of page like this :


First, open dndindex.html with a text editor

search this line : '<div class="ow_page_container">'

ow_page_container contains the entire content of your page, then we will position our block at the top of it.
Below the line
'<div class="ow_page_container">', add a new line and write this :

    <div class="ow_announce">

You can replace 'ow_announce' by which name you want.
A 'div' is a container inwhich you can put anything you want as text, paragraphs, images, ...
Our div 'ow_announce' will contains our announce or what you want.

On the next line, add :

        <h1>Announce :</h1>

You can replace 'Announce :' by the text you want. It will be the title of our content.
'h1' mean the text 'Announce :' will be displayed like a title (bigger than normal text)

Next, add on a new line :

        </br>

'</br>' is using to pass a line in html. With it, our title will be separeted of our content

After, write what you want on a new line. For example, you can add text only :

This is my text </br>
This text will be dislayed below my title ^^

or you can add a picture :

<IMG SRC="/images/mypicture.jpg" ALT="Alt text" TITLE="Picture Title">

Finally, add this on a new line :

    </div>

'/div' will close our container 'ow_annoucement'

You must have this :

    <div class="ow_announce">
        <h1>Announce :</h1>
        </br>
This is my text </br>
This text will be dislayed below my title ^^
    </div>

Save your file into the folder 'master_pages' of your theme. This file has to have the same name (for example : dndindex.html)
Upload it to your host (in ow_themes/mytheme/master_pages/'

Go to your website, 'Main' page and refresh :


Our container and our text are displayed !
But they are ugly and on the left !

We have to layout them. How ?
CSS of course :D

Do you want a background-image ?
Do you want center it ?

Let's go !

Open your 'base.css' and search this :
'[3] Masterpage & Page Layout'

This part of CSS contains all items for layout

Find an empty line and add this :

.ow_announce {

It means that we will layout our div 'ow_announce'
'{' means the code is beginning

Don't forget to replace 'ow_announce' by name you gave earlier

On the next line, add :

    margin:auto;
    text-align: center;
    width:960px;

'margin:auto' is using to center your 'div' in page
'text-align: center' will center your text in your 'div'
'width:960px' to fix width of your div to 960 pixels

Do you remember these commands ?

Don't Forget : Each command of a CSS file finish by a “;” 

Next, add :

    background: url('images/backannounce.png');
    border-radius: 5px;
    -moz-border-radius: 5px;
    -webkit-border-radius: 5px;

background: url('images/backannounce.png') to set the background of our container

And the 'border-radius' to make rounded corners on our picture

Finally, add :

}

to close.

You must have this :

.ow_announce {
    margin:auto;
    text-align: center;
    width:960px;
    background: url('images/backannounce.png');
    -moz-border-radius: 5px;
    -webkit-border-radius: 5px;
}

Save your CSS and upload it in your theme.
If you want, you can refresh the 'Main' page :


Text and 'div' are now center in page, but we forgot to upload our background image ^^
We have to find a picture for this

For example, I took it :


You can take it, I created it for an old website ^^

Rename the picture you want to 'backannounce.png' and upload it in 'ow_themes/mytheme/images/'

Refresh the 'Main' page on your website and :


Tadaaaaa !
Our announce container is beautiful ! No ?


 -------------------------------------------------------------------------
7/ Export theme 

Okay, you have now what you want. But the theme’s name is always the same and you can’t export it.
How to do it ?   First, create a folder with the name you want. This name will be the name of your own theme.
Put in this folder :
-          Your base.css
-          The folder ‘images’ with your own pictures
-          The folder ‘master_pages’
-          theme.xml Open ‘theme.xml’ with notepad and edit lines how you want like name, author etc.

You can now upload the folder you created in ‘ow_themes’ and activate it in admin panel !
The Forum post is edited by Max Nov 9 '11
Max
Max Nov 8 '11
Next part of tutorial will be dedicated to Oxwall examples (ex : how to put an image for my site title, replace existing pictures,...)

I hope Oxwall team will take the tutorial and layout him, cause it will be quickly unreadable ^^
Kabuto
Kabuto Jan 23 '13
bump!

I'm trying to figure out how users can upload their own profile headers here for their profile and groups.
Purusothaman Ramanujam
How about having this excellent guide in the wiki?
John Stanford
John Stanford Jul 5 '14
Everything is fine , with one major exception...

Nothing is mentioned about how to create an "edit" page in the admin area.

For example... allowing the site owner to change page background color or text color, box background color etc.

Note: I mean using a form element... not editing the CSS. Not everyone knows how to write CSS or even wants to learn. Simple mouse clicks or text fields to change elements.
kalvindarwan
kalvindarwan Dec 21 '23
Maybe the radiator is overheating. Maybe you’ve got a flat tire. Maybe you blew a head gasket at 90 miles an hour. Vancouver Mobile Truck Repair
mudasir
mudasir Dec 25 '23
Off-page SEO is crucial for enhancing a blog's visibility and authority. In the realm of blog comments, strategic engagement plays a pivotal role. Crafting thoughtful comments on relevant, high-ranking blogs in your niche not only builds valuable backlinks but also establishes your blog as an authority. Incorporate blog comment targeted keywords naturally in your comments to optimize for search engines. By participating in meaningful discussions, you contribute to the online community and attract attention to your blog. This proactive off-page SEO approach not only boosts your site's rankings but also fosters connections within your industry, driving sustained organic traffic.  blog comment
Pages: 1 2 3 »